페이지

2013년 12월 13일 금요일

Nail care product

There are additional nail care products.
I found it in Etude House.
 
 
First, Help My Finger Quick Dry Drop.
This procuct helps your nail dry quickly.
Originally it takes long time to dry nail perfectly.
But when you use this procuct, it reduce time to dry.
 
Second one is Help My Finger Overnight Nail Hardner.
In my case, my nail is soft, so usually my nail is broken.
But this product helps you to care your nails and to keep moisture.
Use this before you sleep!
 
 
This is Help My Finger Sunchine Whitener.
This product helps your own nail color whiteneing.
If you do nail frequently, your nail is tinting.
But if you use this it helps your nail look like healthy.
 
This is  Help My Finger Matte Top Coat.
Plain top coat makes your nail glossy, but if you use this top coat your nail is matte.
 
 
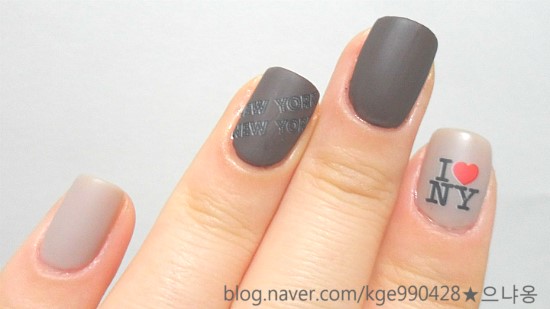
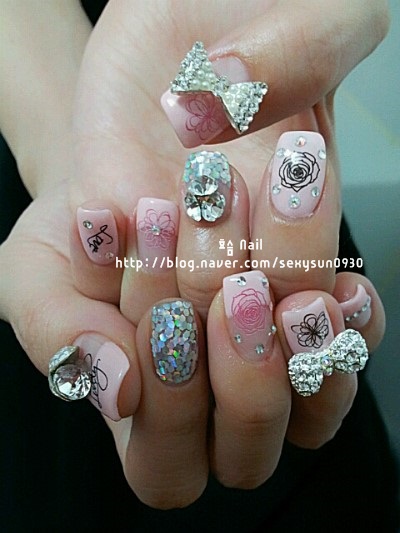
Look at this picture. Isn't it luxurious?
Matte nail make you looks like luxurious!
 
Last one is Help My Finger Art Gel Coat.
It can make your nail do like gel nail.
And also it can help to put nail stone.


Gel nail 2

I was posted about gel nail, how to do gel nail.
And this time I will introduce about benefit of gel nail, how to remove it and about pictures.


I'll talk about the benefit of gel nail polish. It has lots of benefits.
First it takes short time to dry. It takes 30 second dry time that results in diamond-hard gel nails.
Gel nail were created to have stronger and harder nails without doing acrylics.
And gel nail polish is no smearing, chipping, smudging or scratching off.
So it keeps long time. Three weeks hold that conitues to look fresh until you take it off.
The gels are always so smooth and protect nails.
And best of all, gel nail polish is free of harmful chemicals.
 
And it's different from nail polish, so the way to remove is also different.
Unlike a regular manicure that your client can touch up or even do themselves, gel nails require clients to make an appointment at the salon for maintenance and removal. This equals more appointments for you and more money. Gel nail services are also more expensive than a traditional lacquer manicure. Plus your clients will be so in love the results that they will be returning for this service time and time again.
 
http://blog.naver.com/love_it92?Redirect=Log&logNo=90176307368

Ins't it beautiful??

http://blog.naver.com/sexysun0930?Redirect=Log&logNo=80191329921

There are many beautiful design of gel nails.
Try it!!
 

Gel nail 1

Do you know about gel nail?
Usually many people use plain nail polish, but I think gel nail is better than plain nail polish.
Gel nails are a type of artificial nails that most closely resemble the natural nail. They are similar to acrylic nails, but still different. Gel nails are formed by a combination of monomer liquid and polymer powder. The monomer liquid reacts with the polymer powder when put together which, in turn, forms long polymer strands. After being cured under a UV light and LED light they dry and harden to form a resin that looks like a real fingernail. Gel nails can come in any color and can include many different patterns and designs.
(http://en.wikipedia.org/wiki/Gel_nails)
 
 Here are the steps that how to do gel nails. 

Step One

Similar to a regular manicure, begin with clean, dry nails. Shape and file your nails to your desired shape, push back your cuticles, and then thoroughly buff the surface of your nails with nail buffer. The buffing step is important because it creates a little texture to the nail surface that gives the gel something to adhere to.

Step Two

Apply one coat of the bonder to each nail, just as you would a base coat. The bonder acts as glue to help the gel stay put. This was exactly like applying regular polish and required no additional skill. So far, so good!

Step Three

 
Here's a look at the UV lamp in action.
After the bonder, apply one coat of the base polish to each nail on your right hand. Then, insert your hand into the LED lamp for 45 seconds to “cure” (harden) the formula. Again, this was extremely straightforward, just like applying nail polish, and only took a minute.. Repeat the base coat process on the other hand.


Step Four

Apply a coat of the gel color to all of the nails on one hand, then cure in the lamp for 45 seconds. Repeat on the other hand. This step is arguably the hardest since you’re applying the color, and if your manicure is going to last 1-3 weeks, you want it to look as neat as possible. Take advantage of the included manicure stick to clean up edges and wipe away any strap polish before you put your hand into the lamp (after you do that, the gel will harden and you won’t be able to fix it). After you’ve cured the first coat on both hands, apply a second coat of the polish to each hand one at a time, curing the first for 45 seconds first before moving on to the other.

Step Five

Apply the top coat to all nails on one hand, and cure for 45 seconds. Repeat on your other hand. You did it! I couldn’t believe how easy the process was, so I patted the surface of one nail to see if the LED lamp really hardened it – success!

Step Six

To finalize the process, saturate a cotton ball or pad with the gel cleanser – this alcohol-based formula removes any sticky residue left over and leaves your nails clean, dry, and shiny. Now, swipe it over each nail (yes, I know it’s a scary thought – this would usually ruin a fresh manicure!). But gel nails dry instantly in the LED lamp, so you can go ahead and swipe the cleanser over their surface and marvel at the fact that they’re already dry.


Untill now I introduce about gel nails.
If you have gel nail kit, you can do it at your home.
But if you don't have you have to do that in nail shop :(


Character nails

Now I will just introduce many kinds of character nail art.

Do you know Monster Ins????
There are many cute characters.
 
This is the characters of Monsters, Inc.
 
 
Isn't it so cute???
It's so cute, but if you want to do this nail you need lots of colors.
And it looks like hard to do:(
But I will try it later!
 
Next one is bat man!
 Most people know about bat man.
Look at the bat man's hat and look at this bat man symbal.

Batman Wallpaper
 
 
I think maybe they use fake nail. Grind nail as look like bat man's hat and apply black color.
And draw bat man symbol on the thumb nail.
 It looks like hard to do. But it is impactive.
I want to do it special day!
 
The last one is spiderman nail.
 
One nail is point nail that draw spider man's face, and on other fingers draw spiderman suit.
I think silver color spider wed is nice.
It is too fancy, so I will do this nail on special day too.
 
I think these nails are all nice.
So why don't you do this nail!!
 

Cute farm animal nail

Do you like animals?
I like anilmas, and I like animal nail art too.
Because it is so cute.
I found a video how to do fanm animal nails.


First, cow nail.
Apply white color as a base color, and with wihte baby pink nail do as like french. 
And with a black acrylic paint draw brindle, eye, nostril and mouth of cow.
 
Second is chicken.
Apply yellow color as a base and wiht a white color do as like french.
Put black big dot as a eye.
With a orange nail polish draw upside down triangle in the center.
 
Third one is a cat.
Apply any color whatever you want as a base color.
With a black color draw upside down triangle in the center as a nose and draw cat's mouth and whisker.
Lastly put a big black dot as a eye.
 
Fourth one is horse.
Apply brown color as a base color. And with a light brown draw nose and with a black color draw nostril and put a small black dots.
Draw the line in the center with white color.
 
The last one is pig.
Apply pink color as a base color. And with a baby pink color draw oval as a nose.
Using a black acrylic paint put a dots as nostril and eyes. 
 
Finish with top coat!
These nail art is look so easy, so do it yourself!!
 

How to make your own nail stools at home

When you do your nail art, you need some nail stools.
Using nail stool it's easy to do. But it is expensive.
I found the video how to make your own nail stools at home.


In this video, there are four nail stools which can make at home.
Big and small dot pen, big dot pen, striping brush and detailing brush.
 
First, small dot pen.
You can use orange sticks or a toothpick instead. Also you can use dried out ballpoint pen and sharp pencil. Or a bobby pin
 
Second, big dot pen.
You can use a pin attached to a pencil rubber end and blunt pencil.
 
Third one is striping brush.
You can make your own by cutting off the bristles of a big art brush.
You can also cut the brustels of an old nail polish blush, but in the video it does not work as well as art brush.
 
The last one is detailing brush.
You can use your own old eye liner brush or cut the bristles of small art brush.
 
You can prepare your own stools in this video.
I never try to use this, but I will try!

2013년 12월 12일 목요일

Nail sticker

Some times it's hard to apply nail polish.
When you don't have time for waiting nail polish is dried, or just hard to apply it clearly.
Like these time, it's helpful to use nail sticker!
Nail sticker is easy to apply and you don't need to wait.
 
 
It's very easy.
First, apply the base coat.
Second, check the size of nail sticker for your nail, and remove the film.
 
 
Third, stick the nail sticker on your finger. While you stick it on your finger, pull it to the end of the nail.
Fourth, cut the rest of the nail wiht nail file.
Finish!!
If nail sticker is too big, cut it adjust yout nail size.


This video will help you to do it!
 
There are very many kinds of nail sticker.
Use this sticker you can do french nail and so on.
 
If you want your nail maintain long time, do new style or which you can't do, do this nail!